This post was last updated on March 23rd, 2026 at 08:48 am
The clothes dryer is making a clunking sound, and you’re wondering whether to call a pro or buy a new dryer. But wait. There is a third option: the DIY repair. Yes, you can do it. Maybe you can do it. Honestly, it won’t matter as long as you make learning from the repair your goal. Because even if you fail, you’ll gain valuable experience for your next repair (and there will be a next one).
Treat DIY repairs like a class
Before tackling any repair, especially one you’ve never done before, it’s important to adjust your expectations. Unless you’re a handyman and master of all things electrical and mechanical, think of the repair as a “class” and the parts and tools you need for the repair your “class materials.”
When you take a class, there’s an understanding that you’ll make mistakes as part of the learning process. Whether you’re trying to fix a leaky pipe, a smelly dishwasher or a clunky clothes dryer, consider it your classroom project. You are the student, and so it’s OK to screw up. In fact, it’s good to make mistakes, at least a few. That’s how we learn.
First step: the worst-case scenario assessment
Of course, if you undertake a potentially dangerous repair, or one that could leave you without electricity or water, you’re going to regret making major mistakes.
That’s why it’s important to do a worst-case scenario assessment before deciding whether to pursue the repair yourself or hire a pro.
In recent months, I attempted to repair our dishwasher and clothes dryer after concluding my family and I could manage under worst-case scenarios for the two appliances. With the dishwasher, the worst-case scenario came true: I changed multiple parts without figuring out the problem. We had to wash dishes by hand for a few weeks until I finally gave up and bought a new dishwasher. Not a big deal. It wasn’t a major inconvenience. I now know a heck of a lot more about dishwashers than I did before attempting the repair.
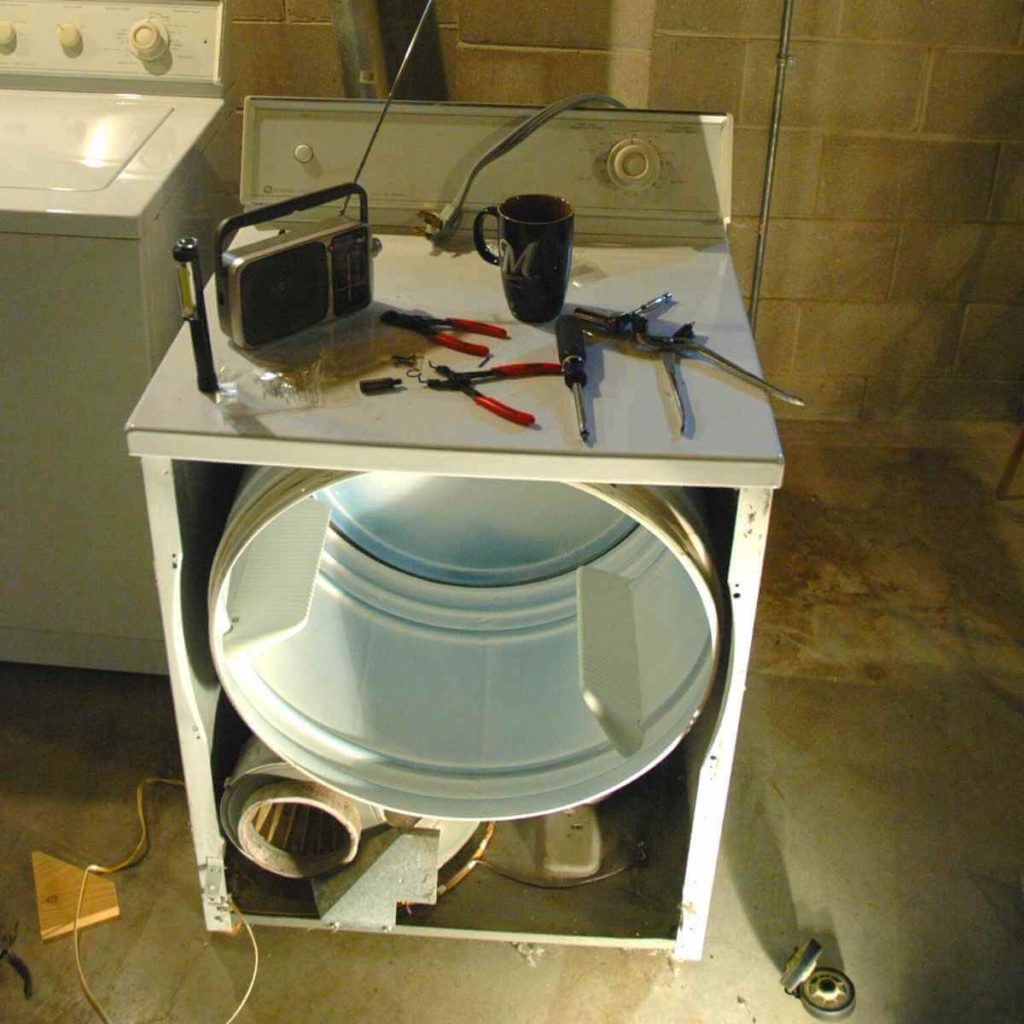
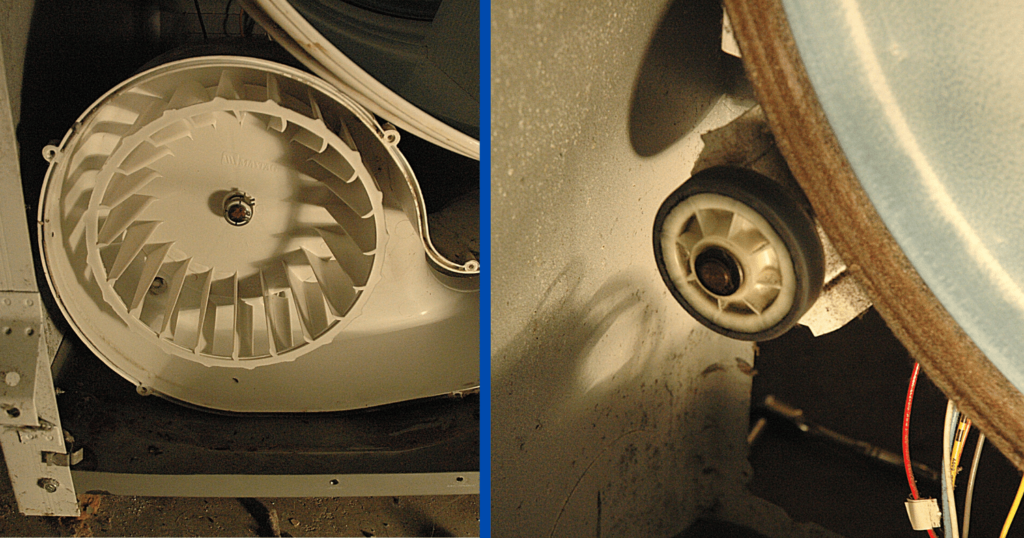
The clothes dryer involved a similar assessment, though I eventually succeeded in repairing it. We hung our wet clothes on a clothes line outside for two weeks before I figured out the problem: a malfunctioning blower wheel. The repair dragged out longer than I anticipated because I initially thought the dryer’s drum rollers had worn out. Fortunately, I had made peace with the possible worst-case scenario and had no qualms about drying clothes outdoors. In fact, drying clothes on a line is actually the frugalmatic thing to do (and we should probably be doing more of it).
When to hire a pro
I love learning new things, but there are certain repairs that flunk my worst-case scenario tests. For example, I only tackle plumbing projects that won’t affect the entire home. If I must turn off the water for the entire house to do a repair, that’s a caution flag for me. If I can isolate the repair by turning off the water near the problem, such as for a toilet, I’ll give it a shot. We have three toilets, and so if one goes out, two others are available.
To determine whether to do a repair, I ask myself, “If my efforts fail and this (fill in the blank) can’t be used for a few weeks, how will it affect the household?” If the answer is something like, “Our home would have no heat,” then I call a pro.
The furnace is an example of an appliance I won’t touch except to perform basic maintenance, such as changing the filter. The middle of the winter is not the time to learn how to fix a furnace, in my opinion.
I also steer clear of DIY projects with slim margins for error. When we replaced our cracked and heaved driveway last year, I didn’t dare attempt that project. When you work with concrete, you get one shot to get it right. I didn’t want to take a chance botching the installation of a new driveway.
Also, I don’t do car repairs beyond changing burned-out headlights, inflating tires, topping off fluids or replacing filters. I don’t even try oil changes because I like having our mechanic examine the whole vehicle as part of the oil change. The stakes are too high for me to tinker with the engine, suspension or brakes. Hurling down the road at 70 mph is not the time to discover I don’t know how to correctly install brake pads.
Of course, everybody has their own comfort zone. If you grew up fixing cars with your dad (or mom), you might have more confidence to repair a car. It all depends on that worst-case scenario and whether you feel like you can accept the consequences. In my experience, the lower the stakes, the easier it is to enjoy educating yourself about the repair, especially if the repair fails.
You decide to take on a DIY repair. Now what?
Here are the three signs that you’ve made a good decision to pursue a DIY repair:
- You conducted a worst-case scenario assessment and the results don’t bother you. You feel a low level of anxiety heading into the repair. If you fail, it’s not like your family is going to freeze to death or go without water for a month. While it’s fine to feel inconvenienced by a repair failure, you don’t want your family’s health, safety or sanity to be on the line.
- There are online videos showing how to make the repair. If you find a lot of online resources, that typically means the parts you need are readily available.
- You plan to repair a high-quality appliance. When my family moved into our home in 2016, we inherited a Maytag washer and dryer, each about 15 years old. These two machines are tanks, and I’ll go to great lengths to keep them serviced, knowing many of today’s washers and dryers wouldn’t last nearly as long. Also, I prefer older-model appliances because they aren’t part of the “internet of things” and aren’t loaded with unnecessary features. In my experience, older appliances are typically easier to fix, so long as you can still find parts for them.
Be prepared for setbacks
This is where having the right attitude is so important. Online videos are really helpful, but they can make repairs look easier than they turn out to be. Remember, the people in these videos have a lot of experience with repairs, and you and I might not.
For example, whenever I hear the phrase “reach under” in a repair video, I’m prepared to enter uncharted territory. A repair only gets trickier when you must “feel” your way to a part, especially for a first-time repair.
I’m not saying such repairs cannot be done—just don’t expect them to be as easy as they appear to be in a repair video.
Sometimes, you can come up with your own method to access the inside of an appliance so that you’re not having to “reach under” anything. For my recent dryer repair, the repair video instructed me to “reach under” the dryer drum to access the dryer belt and remove it from a pulley. Instead, I opened the dryer from a back panel and had direct access to the pulley. I removed the belt without having to “reach under” anything.
Multiply by four the ‘expected’ DIY repair time
If the online repair video says a repair will take one hour, multiply that by four. One way to feel frustrated is to expect a repair to take only as long as a professional says it should. In my opinion, the repair times are based on having zero hiccups during the repair, and that’s not realistic for someone who only occasionally pulls apart appliances or small machines. (I also wonder to what extent these videos underestimate the repair times so as not to discourage people from attempting the repair and, ultimately, buying the needed parts from the company promoting the repair videos.)
I also recommend undertaking the repair only during your local hardware store’s business hours. If you run into trouble and need another part or tool, you’ll want to be able to pick up that tool or part while you’re making the repair.
When the problem isn’t the problem
Almost inevitably, you’ll encounter a new problem in the middle of your DIY repair. Sometimes, what you think is the problem isn’t the problem at all. That happened to me with the dryer. I thought the “clunking” sound was coming from the drum rollers, but it ended up being the blower wheel. I had to order another part, and so the repair went into a second week.
DIY repairs get even more complicated when what you thought was the problem is only part of the problem. And you might not even realize there is more than one problem until after you’ve solved the first problem! It can be a surprise to find out you’ve fixed something but only partially. A seemingly straightforward repair can quickly feel like one of those labyrinth puzzles.
For the most part, I keep my cool amid the setbacks because I multiply my repair time by four. Whenever I fix something in the amount of time a repair is “supposed” to take, that’s icing on the cake.
Check online and locally for parts
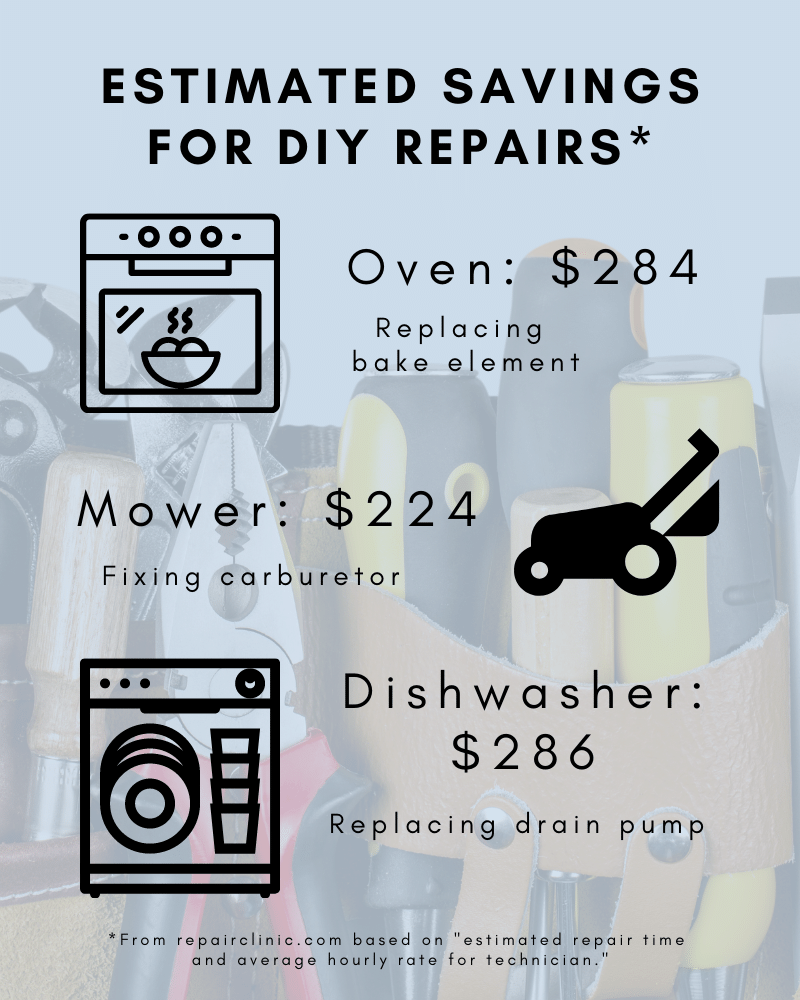
I’ve had success with Repair Clinic, both the videos and part service. If you want to shop around for parts, consider checking with your local appliance store. Sometimes local shops sell the parts for less, and you won’t need to pay any shipping costs. I sometimes use Repair Clinic to find a part number and then shop locally for it.
You’ll become handier over time
I didn’t grow up in a house with parents who took on many repair projects. (They used their dial finger.) Without a background in repairing stuff, I’ve had to build up my knowledge through friends, YouTube videos and the patient employees of local hardware stores. And I’ve learned from mistakes and dare say I’m a “kinda handy person.” I like to celebrate the victories, but I don’t expect the victories.
If you approach repairs with a goal of learning, you’ll feel freer to take pleasure in the repair process. With the right mindset, it’s easier to view setbacks as opportunities. The more repairs you attempt, the more you’ll learn, and the more things you’ll be able to repair in the future. The handier you get, the more money you’ll save by not having to call a pro. These savings will keep pace with inflation, with the cost of labor increasing over time.
Keep in mind, everybody’s threshold for undertaking repairs is different. It’s important to be aware of your limits. Don’t be afraid to challenge yourself. At the same time, don’t be afraid to call a pro if your intuition throws up a red flag.
Feeling inspired to make a repair? Share this link with others and let them know which project you plan to take on.